Navigation example 1
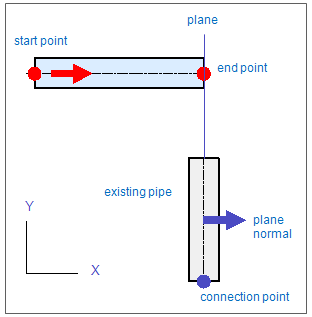
In this example there is an existing pipe parallel to Y axis. You route a pipe which starts leftward and ends perpendicular to centerline of the existing pipe. Routed pipe is parallel to X axis and you can click start point freely.
Step 1:
Start routing a pipe (Alt+P) and move cursor to locate the start point. Click or press Space to accept the start point for pipe and select specs for the pipe. Move cursor a little bit aside the start point. Because in CADMATIC software next point is relative to current cursor location, you have to restore cursor location back to original location pressing Shift+R. If you move cursor by accident, you can easily restore it back to start point again pressing Shift+R.
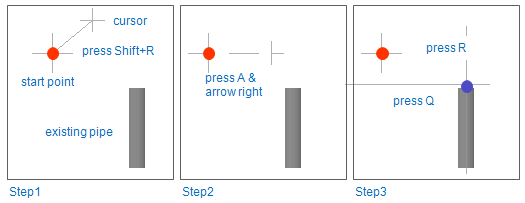
Step 2:
To lock the direction for pipe, press shortcut key A (lock to line) and press arrow key right to set the direction parallel to X axis. Click or press Space to accept the direction. Move cursor to find out that the cursor moves only horizontally (v fixed). If you want to (in this example you don’t) lock the direction vertically, press shortcut key 5. If both directions u and v are fixed, cursor doesn’t move. To unlock direction(s), press shortcut keys 5 and/or 6 again.
Step 3:
Next system point is defined according to plane. Press R (go to plane, point & normal) to define plane which goes through the connection point of existing pipe. Notice that pressing R unlocks the cursor but the direction for pipe still remains. Move cursor near the end of the existing pipe (it doesn’t matter which one) and press Q (nearest connection) to lock cursor to the connection point. Click or press space to accept the point.
Step 4:
To define the direction for plane (direction is defined perpendicular to plane = normal of plane) press arrow key right and click or press Space to accept the direction.
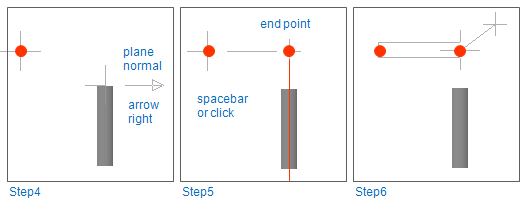
Step 5:
End point of pipe segment is defined. Click or press Space to accept the point and continue routing (Step 6).